If you are a regular Outlook user in an organization for arranging and attending meetings, you might wonder how to cancel Outlook meeting without sending notification to the attendees. Though you might think it is impossible by straightforward method, some ways exist.
We will use some simple tricks to achieve this purpose so your attendees will not know you canceled the meeting (even though that is not the best practice to follow)
How to Cancel Outlook Meeting Without Sending Notification
Here is the catch: Outlook will always send the update to attendees when you cancel a meeting. That is the default and best practice. When you organize a meeting or appointment in Outlook, you should definitely update the attendees when a particular meeting is canceled.
However, we will follow the two methods below to overcome the default behavior.
- Use the work offline method.
- Remove the attendees’ email addresses from the particular meeting/calendar event.
While this workaround is handy, remember it’s crucial to notify attendees of any changes in a meeting as a professional courtesy. Use this option only when it’s necessary to avoid misunderstandings.
Method 1: Use Work Offline
Step 1: Make the Outlook Offline
You can open the Outlook program, go to ‘Send/Receive’ tab, then click the ‘Work Offline’ option. This will bring Outlook to offline mode, which will not send and receive emails.
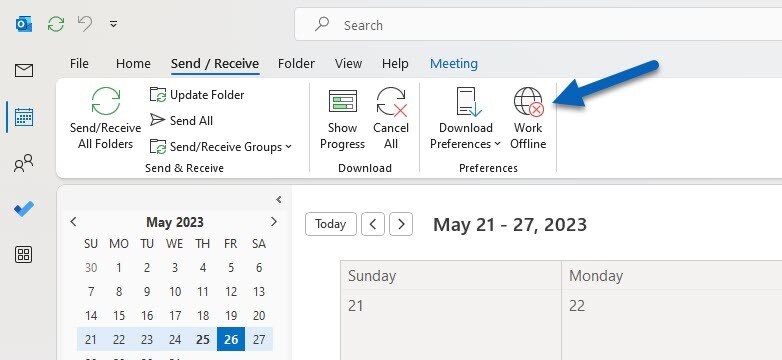
NOTE: You can also ensure your desktop or laptop computer is offline by disconnecting the network cable and Wi-Fi adapter or enabling Airplane mode in Windows 10/11.
Ensure the Outlook is in ‘Offline’ or ‘Disconnected’ mode.
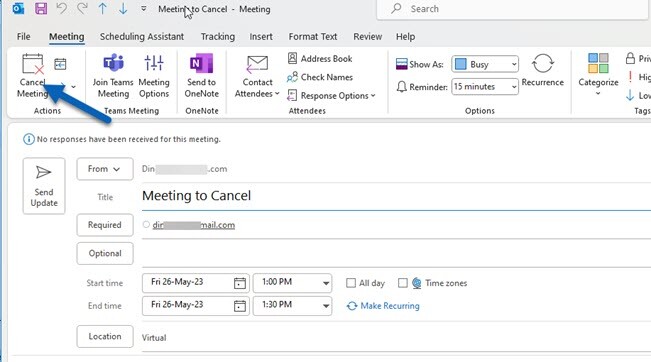
Step 2: Locate the Meeting
Navigate to the Calendar view in Outlook. This view provides an overview of your schedule and lets you locate the meeting you intend to cancel.
In your Outlook calendar, find the specific meeting you want to cancel. Double-click on the meeting event to open its details.
Step 3: Cancel the Meeting
Upon opening the meeting details, click on the ‘Cancel Meeting’ option in the ribbon at the top of your screen. This action will open a new window for sending a cancellation message.
Step 4: Send Cancellation Message (but We are offline)
As mentioned earlier, we don’t have the option to cancel a meeting without sending a notification to others, so click okay to send the cancellation update.

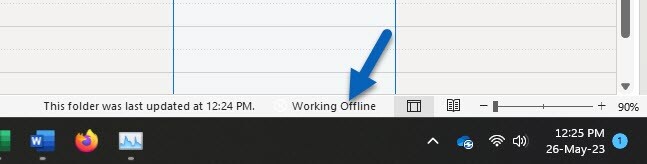
Since Outlook is in offline/disconnected mode, it will not send the email.
Step 5: Delete the Cancellalation update email
Now, locate the cancellation update email from the ‘Outbox’ and delete it. So, the particular email will not be sent even after it becomes online.

So that you know – the meeting will then be removed from your calendar without any notification sent out to the meeting attendees.
Method 2: Remove All Attendees
Here is another method you can follow. We will remove the email addresses of all attendees and save the event. Then cancel it. Since it doesn’t have any email addresses to send, the original attendees will not get any notifications about the canceled meeting.
- Navigate to the Calendar view and open the meeting you want to cancel.
- Remove all attendees from the meeting.

- Click ‘Save & Close.’ This saves the changes and closes the meeting window. If the above method requires a minimum email address, you can add your email address.
- Open the meeting again; this time, it should show no attendees.
- Click ‘Cancel Meeting’ on the toolbar. Since there are no attendees, no cancellation notification will be sent.
Possible Limitations and Workarounds
It is important to note that while this method effectively prevents sending cancellation notifications, it does not remove the meeting from the attendees’ calendars. A potential workaround for this could be to contact each attendee individually, advising them to remove the meeting from their calendars manually.