Are you tired of clicking a link in Outlook only to have it open in a browser you hardly use? We’ve been there, and it’s frustrating when your workflow’s interrupted by such a small yet significant detail. Changing the default browser in Outlook is more manageable than it may seem, and we’re here to guide you through the process.
We’ll walk you through the steps on how to change default browser in Outlook on Windows 10/11 PCs. Whether you’re team Chrome, Firefox, or Edge, we’ve got your back.

How to Change Default Browser in Outlook?
This process is about changing the default web browser in your Windows operating system. When you click a link, such as one in an email, it automatically opens the URL in the computer’s default web browser.
- Click on the Start menu and choose ‘Settings.’
- Select ‘Apps’ and then click on ‘Default apps.’
- Go to the ‘Web browser’ section.
- Click on the current web browser, and change the desired new browser. It can be Chrome, Firefox, and Edge. If that option isn’t available, you must manually set the defaults. Look for a list of file types and protocols and change them individually by clicking on each and selecting your desired browser.
- After adjusting the settings, navigate back to the default apps page to confirm that your selected browser is now listed under ‘Web browser.’
- Close and Open Microsoft Outlook and click on any web link within an email to see if it opens in your newly set default browser.
- If the link opens in your chosen browser, you’ve successfully changed the default browser in Outlook.
Keep in mind this process may vary depending on the version of Windows you have. For example, Windows 10/11 has different options than Windows 7.
Why change the default browser in Outlook?
Changing the default browser in Outlook can significantly enhance your emailing experience, especially if you’re working with links frequently.
Opening Outlook email links in your frequently used browser can help in using the saved password, cookies, and web authentication.
Detailed Steps to Change the Default Browser in Outlook
Here are the detailed steps for changing the default browser in Outlook on the Windows OS platform. I’m demonstrating in Windows 10, which is applicable to Windows 11, too.
1. Even though you can reach the ‘Default Apps’ options under the Settings app in the latest Windows OS, the quick way to do a search is shown below.
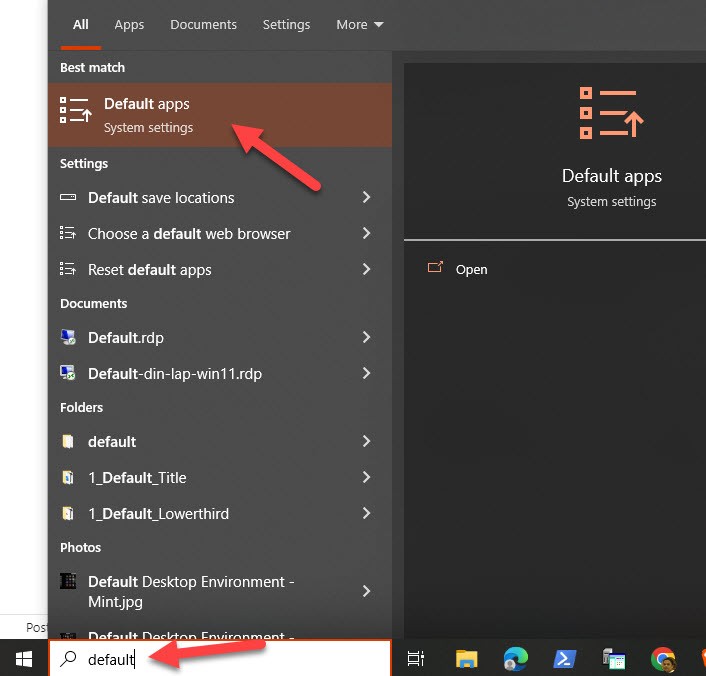
This action will lead us directly to the Default apps section of the Settings.
2. Once the Default apps window is open, we’re in the control room for setting up our preferred applications. Look out for the web browser section, as that’s where we’ll make the necessary changes to enhance our experience with Outlook.

3. Click on the current default browser and select the different browser you need to set as default on your Windows OS and Outlook.
For example, in this case, I’m changing my default browser from Brave to Chrome, so next time when I click a link in Outlook email, it will open in Chrome.
Obviously, if you don’t find the desired browser in this list, it is not installed on your computer. Download it from the official website and install it. Then, visit this same place to change the settings.
4. Check Browser Compatibility
Before moving forward, ensure that the browser is compatible with Outlook:
- Open Outlook and click on any link within an email.
- If your selected browser opens the link, it’s working correctly.
5. Restart Outlook
After we have selected our preferred web browser in the default apps settings, it’s crucial to ensure that Outlook recognizes this change. To do this effectively, restarting Outlook is often necessary.
- Open an email that contains a web link.
- Click on the link to see if it opens in the new default browser.
If the link opens in the browser we set as default, then we’ve successfully completed the process. If not, we may need to repeat the steps or troubleshoot further.
Remember, sometimes a system restart may be required if Outlook or our computer doesn’t recognize the changes.
Common issues and troubleshooting tips
When changing the default browser in Outlook, we may encounter a variety of issues that can hinder the process. Let’s dive into some common problems and our expert insights on how to resolve them effectively.
Hyperlinks Not Opening
It’s frustrating when we click on a hyperlink and nothing happens. Here’s what we can do:
- Check Default Programs: Revisit the default apps settings to confirm that the new browser is indeed set as the default.
- Reset Internet Settings: Sometimes, we need to reset the web settings to align with the new default browser. We can do this by searching for “Internet Options” on our Windows search bar, clicking on the “Advanced” tab, and then clicking on “Reset”.
- Registry Edits: This is more advanced, but editing the registry can solve persistent issues. We recommend back-up before proceeding. Search for “regedit” and navigate to
HKEY_CURRENT_USER\Software\Classes\.html. Make sure the default browser is set correctly here.
Browser Not in List
If our preferred browser isn’t on the list, we can:
- Install the Browser: Make sure to download the browser from the official site and install it.
- Set Program Access: Sometimes, updating the ‘Set Program Access and Computer Defaults’ can help. Access it by searching for it in the control panel and ensuring our browser is enabled for access.
Compatibility Issues with Add-Ins
Occasionally, our add-ins or extensions could be at odds with the new settings. To resolve this, we can:
- Disable Add-Ins: Go to Outlook’s ‘Options’, then ‘Add-Ins’, and disable any that could be causing conflicts.
- Update Extensions: Ensure all browser extensions are updated. Outdated extensions often cause compatibility problems.
| Situation | Troubleshooting Step |
|---|---|
| Hyperlinks Not Opening | Check Default Programs |
| Reset Internet Settings | |
| Registry Edits | |
| Browser Not in List | Install the Browser |
| Set Program Access | |
| Compatibility Issues | Disable Add-Ins |
| with Add-Ins | Update Extensions |