Email signatures are now a must-have in the digital world. They let you share your personality and make a lasting impression on your recipients. To jazz up your signature, include an animated GIF!
Animated GIFs are short and looping images. They can be anything from simple designs to eye-catching animations. They will grab attention and make your signature stand out.
Start by creating or selecting the perfect GIF. You’ll find lots of free tools and platforms online. When you have the GIF, insert it into your Outlook email signature. The process may be different depending on the version of Outlook, but it usually involves the Signature settings.

The benefits of adding animated GIFs to an Outlook email signature
Adding animated GIFs to your Outlook email signature offers plenty of advantages. They make your emails more eye-catching and creative.
- Liven-up visuals: Animated GIFs draw attention right away. They stand out in a sea of static signatures, making a lasting impression.
- Showcase your brand: Put your logo, tagline, and other visuals to reinforce your brand image.
- Increase information retention: Studies say visuals help people remember info better. With GIFs, recipients can keep contact and social media info handy.
- Display professionalism and innovation: The use of GIFs reflects a forward-thinking approach. It leaves a positive impression on clients and colleagues.
In addition, these GIFs are compatible with all devices and platforms. Recipients get the same level of engagement no matter how they access the email.
How to Add Animated GIF to Outlook Email Signature
Step 1: Creating or choosing an animated GIF
Creating an animated GIF for your Outlook email signature is key for interesting, visually appealing communication. To show creativity or represent your brand, a great GIF does wonders! Here’s a guide:
- Brainstorm ideas that fit your message or brand. Look for existing GIFs online. Or, make a custom animation with Photoshop or an online GIF maker.
- Simple works best. Choose GIFs that are short and focused. Avoid excessive movement that could distract or overwhelm you.
- Optimize the file size. Keep it small to avoid long loading times and delivery issues. Reduce frames, colors, and dimensions.
- Test it. Check the GIF across email clients and devices to ensure compatibility and display.
Also, check your organization’s guidelines before using an animated GIF in an Outlook email signature. With the right GIF, you can add personality and visual flair to your message while keeping it professional.
Check the below quick video on how you can create GIFs without Photoshop. I use Snagit to create short GIF.
Step 2: Uploading the animated GIF to a hosting platform
Uploading an animated GIF to a hosting platform is essential for adding it to your Outlook email signature. Here’s a guide to get you started:
- Choose a trusted hosting platform like Giphy, Imgur, or Tenor.
- Create an account if needed. Provide the required information and follow any verification steps.
- Upload the GIF from your device’s storage. Follow any prompts or instructions.
- Once uploaded, copy the unique link for the GIF. This is what you’ll need when creating your Outlook signature.
It’s worth noting that some hosting platforms offer extra features like privacy settings or advanced editing tools for GIFs. Check out these options depending on your needs.
Read Also: How to attach folders in Outlook email
Step 3: Accessing the Outlook email signature settings
- To get to Outlook email signature settings, follow these steps:
- Open Microsoft Outlook.
- Click the “File” tab in the top left corner.
- In the drop-down menu, select “Options”.
- A new window will appear. On the left side of this window, you’ll see a list of categories. Click “Mail” to access the email settings.
These steps will help you find the options to personalize your email signature.
You can also add animated gifs to your signature according to your preferences.
Step 4: Editing the email signature
To customize your Outlook signature, here’s what you need to do:
- Open Outlook. Go to the “File” tab.
- Select “Options” from the drop-down menu.
- On the left-hand side panel, choose “Mail”.
- Under “Compose messages”, click on “Signatures”.
A new window will open. Create, edit, or delete your email signature there.
Now it’s time to get creative! Personalize your signature with custom font, logo, or personal branding elements. Keep it professional and informative.
Before you save any changes, review and test your signature. Add a touch of visual appeal with an animated GIF. This can make a lasting impression on recipients.
Explore more Outlook features to optimize your email communication.
Step 5: Saving and applying the email signature
- Click “File” and select “Options” on the toolbar.
- On the left-hand menu, choose “Mail” in the Outlook Options window.
- Then click “Signatures” button.
- Select which email account you want to add the GIF to.
- Click either “Create” or “Edit” under “Select Signature to Edit”.
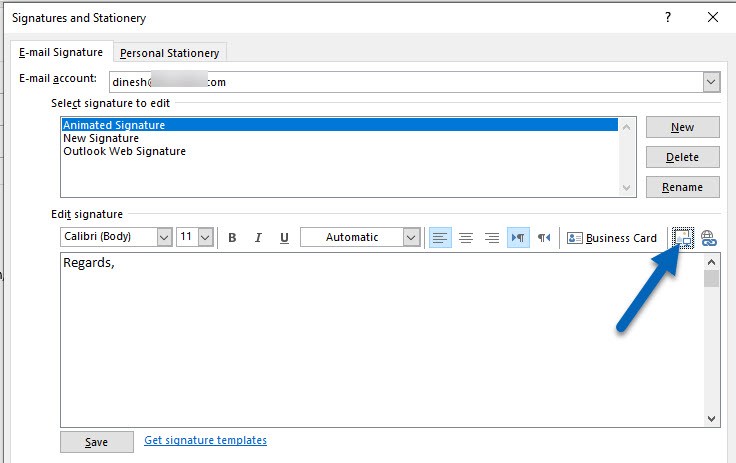
- Put the cursor where you want the GIF in the Signature editor.
- Click the “Picture” icon in the editor toolbar.
- Find and select the GIF file.
- Adjust the size and position of the GIF.
- Click “OK” in each window to save the changes.
Note: Not all email clients support animated GIFs. Test your signature by sending yourself an email before you finalize it.
Once you complete these steps, you can easily apply your signature with an animated GIF in Outlook! Make sure to add a creative touch to your emails and leave a great impression on recipients!
Testing the animated GIF in the Outlook email signature
- Open Outlook and go to the ‘File’ tab.
- Click ‘Options’. This will open the Outlook Options dialog box.
- Choose ‘Mail’ from the left-hand menu. This displays the Mail options.
- Scroll down to ‘Signatures’. Click on it to open the Signatures window.
- Hit ‘New’ to create a new signature. This opens a text editor.
- Position your cursor where you want to insert the GIF image. Also, add any accompanying text if desired.
- Pick the GIF file from your computer or online repository. Make sure it meets Outlook’s size restrictions for email signatures.
- Check that the GIF displays correctly in your signature. Adjust it until it looks great.
- When satisfied, click ‘OK’ to save and apply it.
Your animated GIF should now be visible in your Outlook email signature.
Bring life to your email signature with an animated GIF! Follow these steps and you’ll be able to test it without hassle. Keep track of file sizes and format restrictions imposed by Outlook for optimal results. What are you waiting for?
Troubleshooting common issues
Though it may look interesting and fun to add an animated signature in Outlook, you may end up facing some issues. Here are some of the issues and solutions you need to consider.
Compatibility: Ensure the email client viewing your signature can show animated GIFs. Some may not display them properly or show only static images.
File size: Large GIF files can slow load times and not show properly. Optimize them by reducing the file size without compromising quality.
Hosting: If the GIF is displaying issues, check if it is hosted on a reliable server. Hosting services can sometimes have downtime or compatibility problems.
Spam filters: Spam filters may block emails with animated GIFs, viewing them as potentially harmful. Test the email signature to avoid these issues.
Synchronization: If Outlook is used on multiple devices, double-check if the GIF is synced correctly. Make sure all devices show the signature as intended.
Remember to stay informed about any changes in Outlook’s features or updates that might affect the display of animated GIFs in email signatures.
Take these guidelines and troubleshoot any common issues to confidently add animated GIFs to your Outlook email signature for a more visually appealing look.