If you are still working in an environment you need to send faxes, this article is for you. While email has largely taken over, there are times when sending a fax is necessary. That’s where Microsoft Outlook comes in handy. We can actually send a fax directly from Outlook, combining the convenience of email with the necessity of faxing.

We’ll walk you through the surprisingly simple process of faxing from Outlook. Whether you’re sending important documents to businesses that prefer fax or you’re dealing with international communications, we’ve got you covered. Let’s dive into how to fax from Outlook.
How to Fax From Outlook: Working Steps
Sending a fax from Outlook is a straightforward task that anyone can perform, regardless of their technical expertise.
Here’s how we can integrate the functionality of faxing into our Outlook experience step by step.
Step 1: Choose a Fax Service Provider
First, we need to sign up for a fax service provider that integrates with Outlook. These services act as a bridge between our email and the recipient’s fax machine. They’re essential because Outlook doesn’t have built-in faxing capabilities.
By doing a Google search, you will find plenty of fax service providers in your region that can be integrated with the Outlook program.
Step 2: Configure Your Fax Service with Outlook
After you register with a fax service provider, follow their instructions to configure the service with Outlook. This usually involves adding their email address to your contacts or setting up a new Outlook account based on the service.
Step 3: Compose a New Email
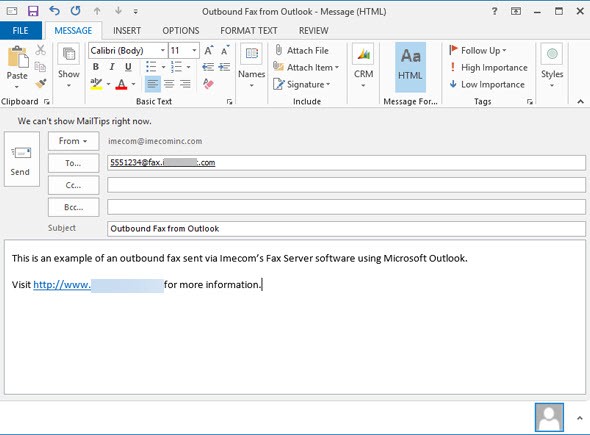
To send a fax, we’ll simply compose a new email. Here’s what we do next:
- Click on New Email.
- Enter the fax number provided by the fax service in the ‘To’ field, followed by the domain provided by the fax service (for example, 1234567@faxservice.com).
Step 4: Attach the Document
Attach the document you want to fax just as you would any email attachment. Make sure it’s in a commonly accepted format, like PDF or DOCX.
Step 5: Include a Cover Page
If we need to include a cover page, we can either:
- Write a message in the body of the email — this will become the cover letter.
- Attach a separate document as the first page of the fax.
Step 6: Send the Fax
Once everything’s in order, just hit the Send button. The fax service provider will convert the email into a fax and transmit it to the recipient’s fax machine.
Step 7: Confirmation
We should receive a confirmation email from the fax service provider once the fax has been successfully sent.
- Always double-check the fax number and email domain to avoid any errors.
- For longer documents, it’s more reliable to attach them rather than placing the entire content in the email body.
By following these steps, we can easily send a fax via email using Outlook, blending traditional fax capabilities with modern convenience. This process is beneficial for businesses or individuals who frequently deal with international partners or industries that still rely heavily on faxing for secure document transmission.
Best Practices for Faxing from Outlook
When it comes to how to send a fax with Outlook, understanding the best practices ensures that our faxes are sent efficiently and securely.
Here are some guidelines to make sure we’re maximizing Outlook’s fax capabilities.
Use Reliable Fax Service Providers
- Ensure the fax service we choose is reliable and well-integrated with Microsoft Outlook.
- Research and compare different providers to find one that suits our specific needs.
Secure Your Fax Communications
- Always check that the provider offers secure transmission to protect sensitive information.
- Consider using encryption if we’re sending confidential documents.
Regularly Update Contact Lists
- Maintain a current list of fax contacts within Outlook to streamline the process.
- Add frequently used fax numbers to our contacts to avoid manual entry each time.
Test the Service Before Important Tasks
- Send a test fax to confirm that the service and configuration are working as expected.
- Do this well in advance of any deadlines to allow time for troubleshooting.
Confirm Fax Number Formats
- Double-check fax numbers for accuracy before sending.
- Be aware of international dialing formats when faxing abroad.
Monitor Sent Fax Status
- Utilize delivery confirmations to ensure the fax has been successfully received.
- Check for any error messages and have a plan for quick resolution if a fax fails to send.
- Make sure documents are in a supported format and are not too large to send.
- Keep the layout simple, and be mindful of how the document will appear when faxed.
By sticking to these best practices, you will find that knowing how to fax from email Outlook becomes an easy, efficient part of our workflow. Plus, with these tips, you can avoid common pitfalls and ensure your communication remains professional and on point. Remember, a little bit of preparation goes a long way in making sure our faxes reach their destination without any hitches.