Let’s say that the time has come to leave your current job, so the next question that comes to any computer user is, how to save Outlook emails when leaving job? It’s important for you to keep a record of your professional correspondences – If allowed in your current organization.
In this article, I’ll walk you through the simple steps to ensure you keep all important information in your Outlook emails. Whether it’s for legal reasons, personal reference, or just peace of mind, I’ve got you covered.

Legal Compliance for Handling and Storing Outlook Emails
Before you read this guide further or take any actions on your Outlook, please ensure you can back up/copy these Outlook emails in compliance with legal regulations and company rules/policies at your workplace. When involved in tasks linked to the company’s confidentiality, like research and development or managing client’s private data, verify that you’re permitted to transfer these emails beyond the company’s network.
4 Ways to Save Outlook Emails When Leaving a Job
We will discuss the 4 methods any user can use to save/copy emails to external storage while leaving the job.
- Create a new PST and move the only required emails to the new PST file.
- Just copy and paste the emails from Outlook to a USB drive via Windows Explorer.
- Export all (or particular Outlook folded) to PST
- User 3rd party tools
Organize Your Emails for Easy Retrieval
I highly recommend performing this step before saving or copying the emails, especially if you have many. Organize your emails for easy retrieval and export.
I’ve found that a simple yet effective folder structure saves time and hassle. Start by creating main category folders based on the email content. Common categories might include:
- Projects
- Legal Documents
- Compliance
- Client Communications
- Internal Team Correspondence
Under each main category, you can create subfolders with specific names, dates, or keywords that will make searching for them later easy.
Here’s an example of how I structure my folders:
- Projects
- Project X (2022)
- Project Y (2023)
- Compliance
- Audits 2022
- Policies Updated 2023
- Client Communications
- Client A (Contracts)
- Client B (Meeting Notes)
Once you structure the Outlook folders like the above with the required emails to save from Outlook while leaving your job, it is going to be an easy job.
Method 1: Create a new PST and Move Emails
Here is the first method you can follow if you have many emails to save to your external or cloud storage.
1. Create a new PST file from Outlook. You can store this PST file on a local disk (then move it to your USB storage) or directly create it on your external storage.
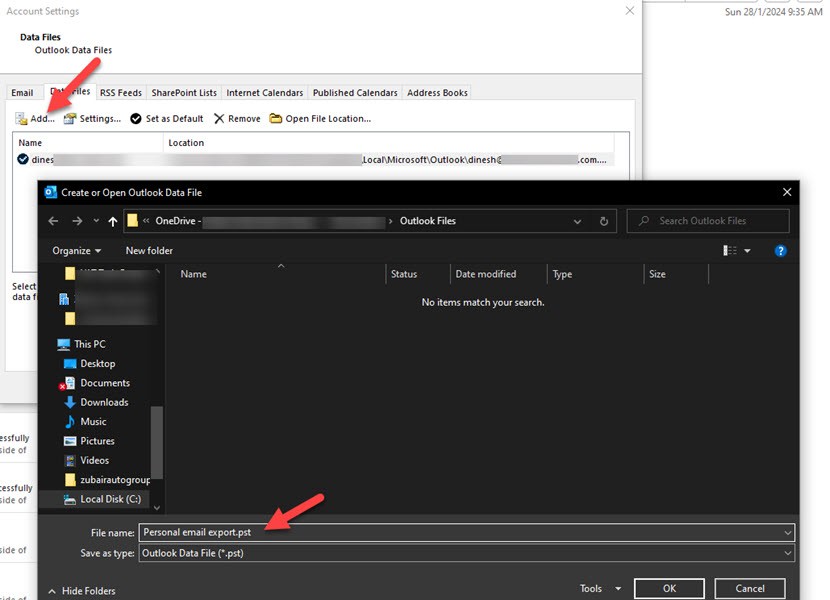
Once the PST file is created, it will appear as a separate folder on the left side of Outlook.
2. Now select the email or emails you want to move, right-click, and choose the move option. This will list the potential folders in your Outlook. Select the PST file you created in the earlier step and press OK.

Remember that once you move emails, they will disappear from the original location. Make sure this is allowed in your workplace.
3. Once the required emails are moved to the new PST file, you can close Outlook or remove the PST file from your Outlook account settings.
Now, you have the required emails in a portable format that can be attached to any Outlook or PST file reader.
Method 2: Copy Past Emails/Print to PDF
This method is suitable if your mailbox is relatively small or you intend to save only a few emails before leaving your job.
This is to select the specific emails, and copy and paste them manually.
Here is how to do it:
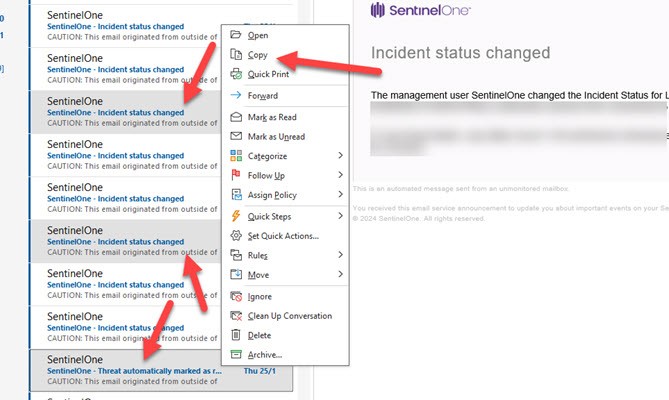
1) Select the emails (with the SHIFT or CTRL key), right-click, and copy. The emails will now be copied to your computer’s clipboard.
2) Browse your USB or external/cloud storage in Windows Explorer, and just paste it like a normal file copy/paste.
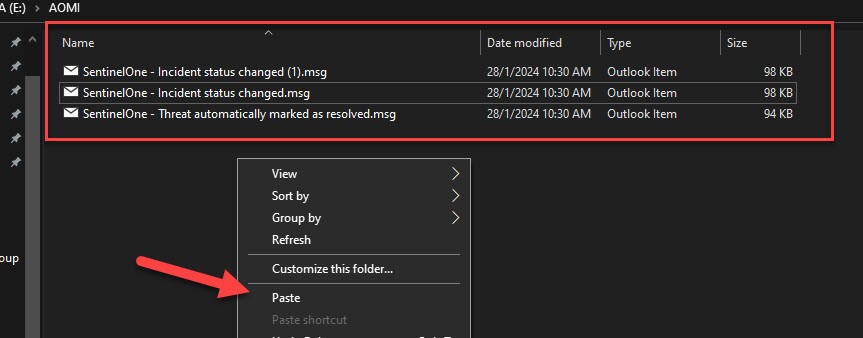
Every email will be saved in .msg file format. You can open these files/emails on different computers with most of the email client software.
Save and Print Emails as PDF
If you want specific emails saved in a PDF file, not in .msg format like in the earlier step, follow these steps. For this purpose, we can utilize the Windows PDF printer. Here are the steps.
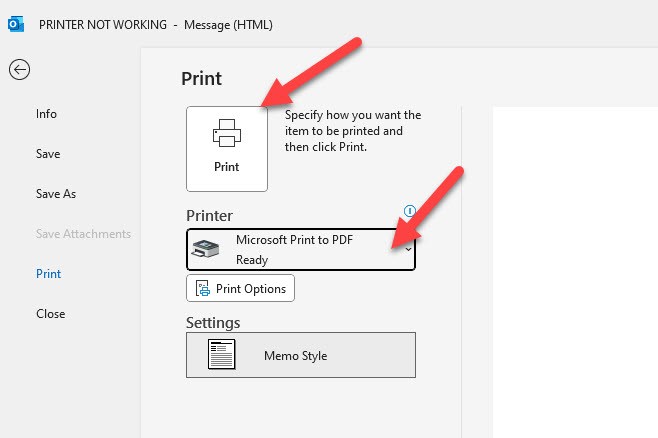
- Select the email (or multiple emails – since you can print multiple emails together in Outlook), go to File and Print.
- Most of the latest Windows Operating Systems, such as Windows 11 and 10, have built-in PDF printer. Make sure to select the Microsoft Print to PDF and press Print button.
- Select the location to save your email PDF print output, and then you will have the selected emails in PDF file format.
Method 3: Export All Emails to a Single PST
This method is suitable if you have the freedom to export all emails in a particular mailbox or subfolder. It is similar to backing up your Outlook data.
Here are the steps to follow:
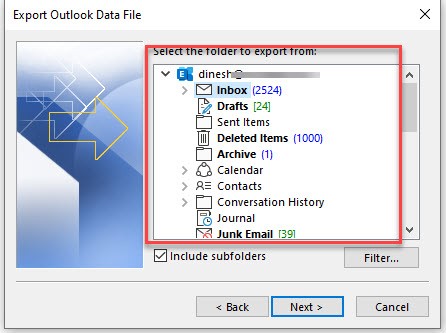
1. Open Outlook, go to ‘File’, then ‘Import/Export’.

2. Select ‘Export to a file,’ then the PST file option. Select the folder to export as PST. If you have organized the only required emails to a particular folder, like we mentioned earlier, then you can just select the only folder here.
Having limited and selected emails will improve the speed of the export. Also, it will be easy to browse and access the required emails after you leave the job instead of going through hundreds of emails later.
Method 4: Use 3rd Party Tools
Most of the time, you don’t need to perform this step, but it is good to know that some third-party email backup software can help you save emails to external devices while leaving the job.
This step requires installing a program on your work computer, which could be limited in some cases.
If you still have questions about how to save Outlook emails when leaving a job, I think it’s best to use the built-in MS Outlook features we discussed earlier.
Why It’s Important to Save Outlook Emails When Leaving a Job
When preparing to leave a job, you might wonder why it’s necessary to save your Outlook emails. The reasons go beyond mere nostalgia or routine. Protecting corporate information and ensuring a smooth transition for your successor are critical responsibilities. Here are some key reasons to prioritize saving Outlook emails:
- Legal and Compliance Reasons: Certain industries mandate the retention of correspondence for legal and auditing purposes. Emails could serve as evidence or references in disputes or investigations.
- Handover Processes: Your emails contain a wealth of information that could help the next person in your role. From project details to client communication, these records pave the way for a hassle-free handover.
- Professional References: Past emails can be a trove of professional contacts and work history. You never know when you’ll need to reach out to a former colleague or reference a past project in your career.
- Protecting Personal Data: Occasionally, work emails merge with personal information. You’ll want to ensure you have copies of anything personal before your account access is revoked.
Consolidating Records: As you move on, it’s wise to have a personal record of your contributions and achievements. Email conversations often highlight your successes and the roles you’ve played in pivotal projects.
Remember, the goal isn’t to hoard every single email but to be selective in preserving those that might have significance later on. The process shouldn’t breach any company policies on data retention, so always check with your HR or legal department about what’s permissible to take with you.
Staying organized during this process is essential. Make use of the exporting, archiving, or printing features within Outlook to categorize and store the emails that matter most. By taking this step, you’ll not only cover your bases from a legal and professional standpoint but also create a repository of your work lifecycle that can be invaluable in your future endeavors.