If you’re missing the familiar layout of Outlook and want to switch back to the classic view, you are at the right place to learn it.
Changing Outlook to a “Classic View” can mean different things depending on your Outlook version (such as Outlook for Microsoft 365, Outlook.com, or the Outlook versions included with Microsoft Office 2016, 2019, etc.).
Microsoft frequently updates the Outlook interface to add new features and improve the user experience, sometimes leading to users missing the older, more familiar layouts.
How do I Change Outlook to Classic View?
To change Outlook to Classic View, go to Outlook’s View tab, select Change View, and choose Compact or Single. This adjusts the layout to resemble Classic View. However, exact Classic View restoration may depend on your Outlook version, as newer versions may not support the original classic interface.
Here are general guidelines on how you can attempt to revert or approximate a “Classic View” in various versions of Outlook:
For Outlook Web (Outlook.com)
- Interface Changes: The web version of Outlook does not typically offer a way to revert to a classic version as the interface updates are rolled out to all users. However, you can customize the reading pane and layout options to make it feel more like the classic version.
- Simplified View: Look for settings that allow you to simplify the interface. For example, you might be able to adjust the density of the message list or change the theme to make it look more straightforward.
For Outlook for Microsoft 365 and Outlook 2016/2019
Suppose you’re using a desktop version of Outlook, such as Outlook for Microsoft 365 or Outlook 2016/2019, and you’re finding the newer interface challenging. In that case, you can customize it to some extent, though a complete rollback to a “classic view” as seen in much older versions (like Outlook 2010 or 2007) isn’t directly possible.
Change from New Outlook App to Old Outlook
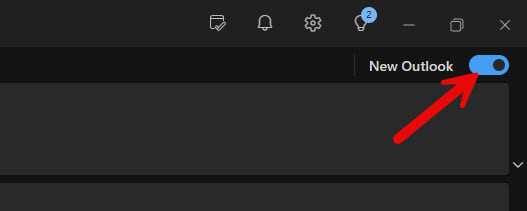
If you use Windows 11 and the latest Office 365 build, you may notice the Outlook (new) app as the default client. It almost gives similar Office 365 web access on the desktop app, but if you want to switch to the earlier traditional Outlook view, follow the below steps.
- Open the Outlook and toggle off the ‘New Outlook’ option. This will close the new Outlook and open the old one, which has a similar classic view.
If you want to remove the new Outlook app from your computer and keep the old one with the classic view, then you can think about uninstalling it.
- Navigate to Settings App> Apps > Installed apps.
- Locate the Outlook (new) app and click on the 3 dots.
- Select Uninstall to remove the app.

Change from Navigation Pane
If you are already using the standard and old versions of Outlook, you can play around with some appearance customization to get the classic view look.
Navigation Pane: You can adjust the Navigation Pane to resemble older versions more closely. Right-click on the Navigation Pane, select “Navigation Pane Options,” and adjust to your liking.
Use Classic Ribbon: Some versions of Outlook allow you to switch back to the classic ribbon. Go to File > Options > Customize Ribbon and look for an option to enable the classic ribbon.
Reading Pane: Adjust the Reading Pane to be on the bottom instead of the side, as older versions of Outlook had. Go to View > Reading Pane > Bottom.

Theme and Background: Changing the theme to a simpler one or a “Classic” theme might also help. Go to File > Options > General, and then under “Personalize your copy of Microsoft Office,” you can select a different theme.
Adjust the Layout: Within the Outlook settings, we can tweak certain visuals to simulate the classic view:
- Navigation Pane Options: Simplify by minimizing or ordering folders.
- To-Do Bar: Turn off to reduce on-screen clutter.
- Message Preview: Set to 1 line or off to closely resemble the classic view.
Look for Classic View Themes or Templates: Sometimes, Outlook versions have themes or templates that replicate the classic view:
- In the Outlook Options dialog, select Themes.
- Browse through available themes to find one with a classic look.
Read Also: Why does Immersive Reader keep turning on in Outlook?
Selecting the “Classic View” Option
Once you’ve navigated to the Outlook settings and located the “Mail” and “Layout” categories, it’s time to transition to the classic view. This option might not be explicitly labeled as “Classic View,” but we can guide you through the process to achieve the desired result.
Firstly, check the display settings within the layout options. Here, you might find settings that tweak the appearance of your mailbox. Look for terms like “Compact” or “Single-line view” – these settings can mimic the classic view’s simplicity.
- Go to the “View” tab at the top of the screen.
- In the “Current View” group, you’ll see an option labeled “Change View.”
- Click on “Change View,” and a list will appear showing different view options.
- Look for “Compact” or a similar option that simplifies the view.
- Select this option to apply changes to the mailbox layout.

Customizing Classic View
Once you’ve restored the Outlook Classic View, personalizing it to match your preferences is the next step. We’ll guide you through tailoring your classic view for optimal use.
Access Customization Options
Firstly, we navigate to the View tab at the top of Outlook. Here, you’ll find various options to modify the appearance of your email list and reading pane. Click on View Settings to open a more detailed customization menu.
Modify Columns
In the Advanced View Settings dialog, click on Columns. This allows us to adjust which details are displayed for each email, such as the sender, subject, or received date. You can add or remove columns based on what’s important to you.
Change Font Size and Type
For those of us who prefer larger text, hitting the Other Settings button enables changing the font size and type. It’s helpful if you’re looking for better readability, or just a different aesthetic.
Arrange Emails
The Sort feature lets us organize emails in a way that suits our workflows. Sort by date, sender, or even email size – whatever helps you stay on top of your inbox.
Use Conditional Formatting
Conditional formatting is a powerful tool that applies different fonts or colors to emails based on certain criteria. It makes important emails stand out at a glance. Tap on Conditional Formatting and set rules that support your priorities and alerts.
Save Your Settings
After tweaking your settings, it’s essential to click OK to save the changes. Outlook will instantly reflect your customizations.
Test and Tweak
Take some time to work with your newly customized Classic View. You can always dive back into the settings and adjust if something doesn’t feel right. We advise changing one thing at a time so it’s clear what affects your experience and how.
Remember, customizing is all about creating an environment that feels comfortable and improves your productivity. Take advantage of these options to make Outlook work best for you.
Final Note
It’s important to remember that over time, software companies like Microsoft phase out older interfaces in favor of new developments that they believe offer a better user experience and more advanced features. While adjusting to a new interface can be challenging, many changes are designed to improve productivity and integration with other modern software and services.
If you are using a specific version of Outlook and need more detailed instructions tailored to that version, or if you have other questions about using Outlook, please let me know in the comments section!