Organizing and making emails look good is vital in today’s business landscape. Tables in Outlook can help make emails more effective and attractive. Whether you use Microsoft Outlook for personal or business use, adding tables can convey the message and numbers very well.
So, the next question comes in, how to insert table in Outlook emails? That’s what we are going to discuss in this guide.
To insert tables in Outlook, you have several options. One approach is to use the built-in table tools.
Open an email. Go to the “Insert” tab. Click the “Table” button. Then pick how many rows and columns you want.
Another choice is to copy and paste a table from another program, like Microsoft Word or Excel, into your email. This way you can take advantage of the extra formatting possibilities of these programs.

You can also insert an HTML table directly into your Outlook email. To do this, switch to HTML editing mode and paste the HTML code for your table.
Overview of Microsoft Outlook
Microsoft’s Outlook is an amazing email client, offering more than just email management. It’s key feature? The ability to organize and sync calendars, contacts & tasks in one place. Stay productive and organized – whether managing personal life or work responsibilities.
Outlook is one of the most popular email clients globally, with millions of users. Thanks to its power-packed functionality for seamless communication and productivity.
At MailBoxInsights, we covered many how-to tips on Microsoft Outlook.
Importance of Tables in Outlook Emails
Tables are vital for sprucing up and boosting the usefulness of Outlook emails. They let you present info in an orderly fashion, helping recipients comprehend the content easily.
Let’s consider a hypothetical situation. Suppose you are sending an email to team members, outlining their upcoming tasks. With a table format, you can show each task, its deadline, who it’s assigned to, and its priority level.
| Task | Deadline | Assigned To | Priority |
|---|---|---|---|
| Task 1 | 07/15/2022 | John | High |
| Task 2 | 07/17/2022 | Sarah | Medium |
| Task 3 | 07/20/2022 | David | Low |
This structure gives recipients an obvious overview, and they can quickly spot their own tasks and deadlines in a single glance. This prevents confusion and makes sure everyone is aware of their duties.
Tables in Outlook emails offer hidden advantages. One of them is that these tables adjust depending on the email client or device used by the recipient. No matter if it’s a desktop computer or a mobile device, the table will automatically resize to fit the screen without changing its shape or readability.
How to Insert Table in Outlook: Step-by-Step
Wondering how to insert a table in Outlook? Look no further! We have the perfect guide. Follow these easy steps for a more organized and professional email.
- Launch Outlook: Open Microsoft Outlook on your computer. Make sure you are logged in.
- Click on “New Email”: Start composing a new message with this button. A blank email template will appear.
- Insert Table from Toolbar: Click on the “Table” icon at the top of the template. A drop-down menu will appear with options.
- Choose Rows and Columns: Select the number you want from the drop-down menu.
- Customize Table Size: Drag the borders or corners to adjust.
- Add Content: Click on each cell and start typing or copying/pasting.

RELATED: How to rotate pictures in Outlook
How to Modify Existing Tables in Outlook
After inserting the table and some data into your Outlook email, you can modify the table. Microsoft Outlook provides similar options for table customization like Word and Excel.
While composing new or replying to the existing email with the table, click on the table to get extra options.
Depending on the Outlook version (I’m using the latest Office 365 Outlook), you will get the additional tab and table options as below.
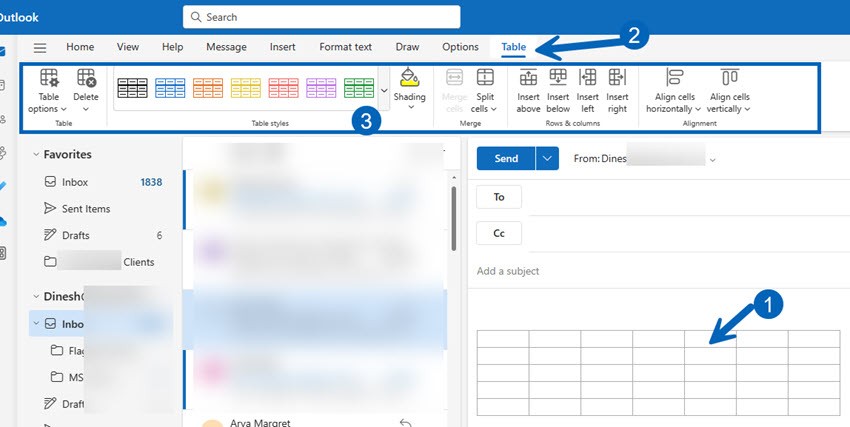
We summarized some of the useful and commonly used table options for better understanding while composing email.
| Icon Name | Feature Description |
|---|---|
| Insert Table | Allows you to insert a new table. |
| Draw Table | Lets you draw a table manually with the cursor. |
| Delete Table | Provides options to delete the table, rows, or columns. |
| Insert Above | Inserts a new row above the selected row. |
| Insert Below | Inserts a new row below the selected row. |
| Insert Left | Inserts a new column to the left of the selected column. |
| Insert Right | Inserts a new column to the right of the selected column. |
| Merge Cells | Combines two or more selected cells into one. |
| Split Cells | Splits a cell into multiple cells. |
| Table Style Options | Provides various styling options for the table. |
| Table Styles | Offers a gallery of pre-defined table styles. |
| Borders | Allows customization of table borders. |
| Shading | Adds background color to selected cells or the table. |
| Cell Alignment | Aligns the content within the table cells. |
| Cell Size | Adjusts the size of rows and columns. |
| Table Properties | Offers advanced settings for the table layout and options. |
Tips and Best Practices for Using Tables in Outlook
Tables are great in Outlook! Use <table>, <td> and <tr> tags to create one. Visuals help to make your data look good and accurate.
Tables offer special features! Merge cells, adjust column widths, and add borders for a professional look. Grouping related info into rows and columns makes it easy to read and understand.
Tables have been around since the beginning of web design. They grew with email clients like Outlook, and people learn new ways to use them every day! Tables are essential for structuring emails and displaying content. They help with improved communication.
Conclusion
Inserting a table in Outlook? It’s simple! Just follow the steps mentioned in this guide.
- You can also customize tables to suit your needs. One great thing is the formatting options. Adjust cell size, borders, colors, and alignment with just a few clicks. Plus, you can import data from other apps like Microsoft Excel.
- Outlook also lets you add or delete rows and columns. You can also sort and filter data within the table. This saves time and effort.
- This feature works on Outlook 2016, 2019, and Microsoft 365. So, all versions can take advantage of these capabilities.