If you regularly use Microsoft Outlook and want to know its essential features, the Retention Policy is one of the must-know settings.
A retention policy in email communication is a pivotal aspect of data management. It refers to the rules and protocols established by an organization to manage the lifecycle of emails – from their creation or reception to their ultimate deletion or archiving. The goal is to ensure regulatory compliance, maximize efficiency, protect important data, and reduce unnecessary clutter. Properly structured retention policies balance regulatory requirements with business needs while considering available resources.
This guide will show you how to change and manage the retention policy in Microsoft Outlook. We will cover the desktop Outlook application and the web browser online version.
Understanding Retention Policies in Microsoft Outlook
Microsoft Outlook, a part of the Microsoft 365 suite, allows businesses to set and modify retention policies. These policies can be applied at various levels— to individual items, complete mailboxes, or even at an organizational level.
A well-managed retention policy helps you:
- Organize Your Inbox: It assists in reducing clutter by automatically moving older emails to the archive or deleting them.
- Regulatory Compliance: It ensures compliance with business, legal, and regulatory requirements about data retention.
- Data Protection: It safeguards crucial data from inadvertent deletion.
Understanding its importance, we can explore the step-by-step process to change the retention policy in both the Outlook Web interface and the Outlook desktop application.
Steps to Change Retention Policy in Outlook Web Interface
Step 1: Open Outlook on your Browser
- Open your preferred web browser and visit outlook.com.
- Enter your login credentials and press enter.
Step 2: Navigate to ‘Options’
Locate the gear icon on the top right corner of the page, representing ‘Options’. Click on it.
Step 3: Choose ‘View All Outlook Settings’
A new sidebar will appear. Scroll down to the bottom and click on ‘View all Outlook settings’.
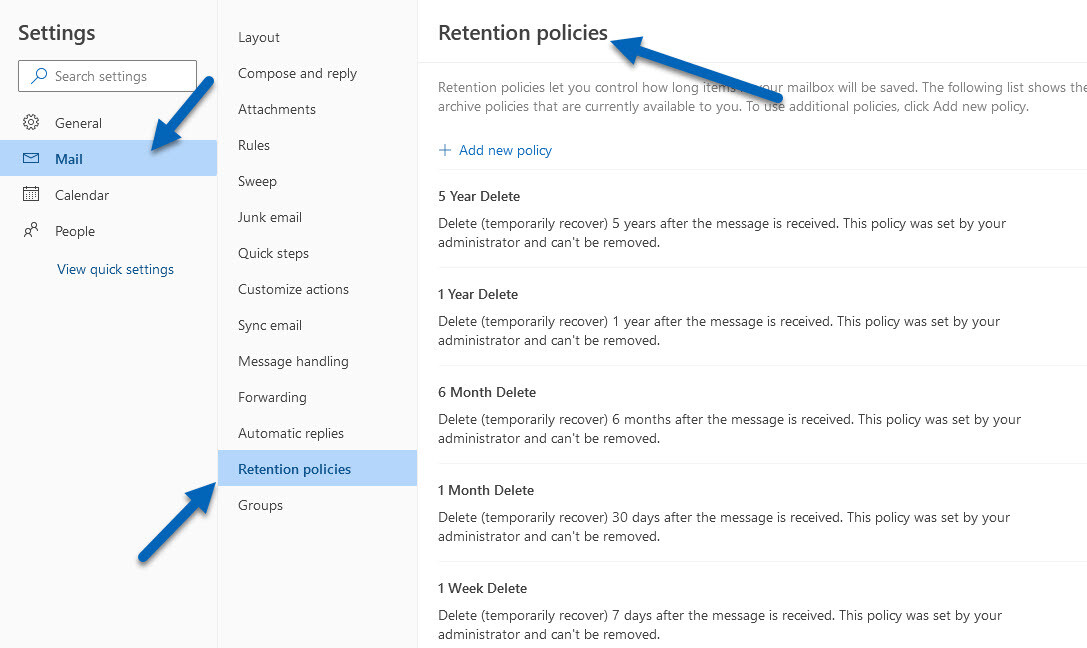
Step 4: Visit ‘Mail’ > ‘Retention Policies’
In the settings dialog box, click on ‘Mail’ followed by ‘Retention policies’.
Step 5: Change Retention Policy
Here, you can view the existing retention policy and change it as per your requirements.
How to Change Retention Policy in Outlook Application
We can’t change or create new retention polices from Outlook desktop applications on any OS, like Windows 11, Windows 10, or macOS. If you want to create or modify any existing retention policies for your email account, use the Outlook online web access we discussed earlier.
From the Outlook application, we can assign the policies to a particular email or an email folder. Here is how to do it.
- Select the email you want to apply the retention policy and click ‘Assign Policy.’ Here you can select the defined policies.
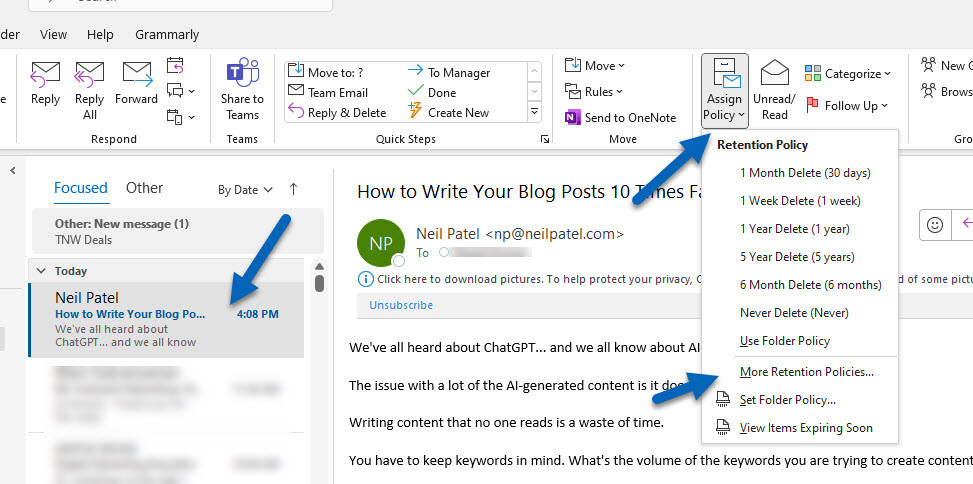
- If you want to apply a folder retention policy, select the ‘Set Folder Policy’ option.
- Outlook will open the web browser and take you to your online web account if you try to modify or create any existing policies – since it can be done with the Exchange online only.
Troubleshooting and Noteworthy Features
Encountering issues while changing the retention policy? Try these solutions:
- Unable to Find Retention Policies: If you can’t find ‘Retention Policies’, it’s likely that your organization doesn’t have it enabled. Contact your system administrator.
- Policy Doesn’t Apply: If changes to the retention policy don’t take effect, it’s possible the policy isn’t assigned to the mailbox. Check the policy assignment.
Remember, Microsoft Outlook also allows the automatic archiving of old items, a crucial feature for efficient data management. You can set auto-archiving under the ‘AutoArchive’ settings, which complements your retention policy.
Read Also: How to turn off meeting Insights in Microsoft Outlook
Conclusion
Changing your retention policy in Microsoft Outlook can go a long way in managing your mailbox efficiently. Not only does it help declutter your inbox, but it also ensures data protection and helps meet regulatory compliance requirements. Remember, the steps may vary slightly depending on the version of Outlook you’re using, but the core procedure remains the same.
Frequently Asked Questions
Can I apply different retention policies to different folders in my mailbox?
Yes, you can apply different retention policies to different folders in your mailbox in Microsoft Outlook.
What happens when an item reaches its retention age?
When an item reaches its retention age, the action specified in the retention policy is executed. It could be moving the item to an archive or deleting it.
Can I recover a deleted item?
Yes, Outlook provides a ‘Recover Deleted Items’ option. However, the item can only be recovered within a specific period post-deletion, depending on the settings set by your administrator.
Remember, the control is in your hands. So go ahead and set a retention policy that suits your needs and facilitates smoother operations!